
If you’ve got a narrow alley running down the side of your house, you might be sitting on some seriously underused space. A side return extension takes that dead strip of land — usually just a pathway to the bin — and turns it into something genuinely useful. For terraced and semi-detached homeowners across the UK, it’s one of the most popular ways to gain a bigger kitchen, an open-plan living space, or a proper dining area without touching the garden.
Here’s everything you need to know: what a side return extension actually involves, how much it costs, whether you need planning permission, and what you can realistically expect from start to finish.
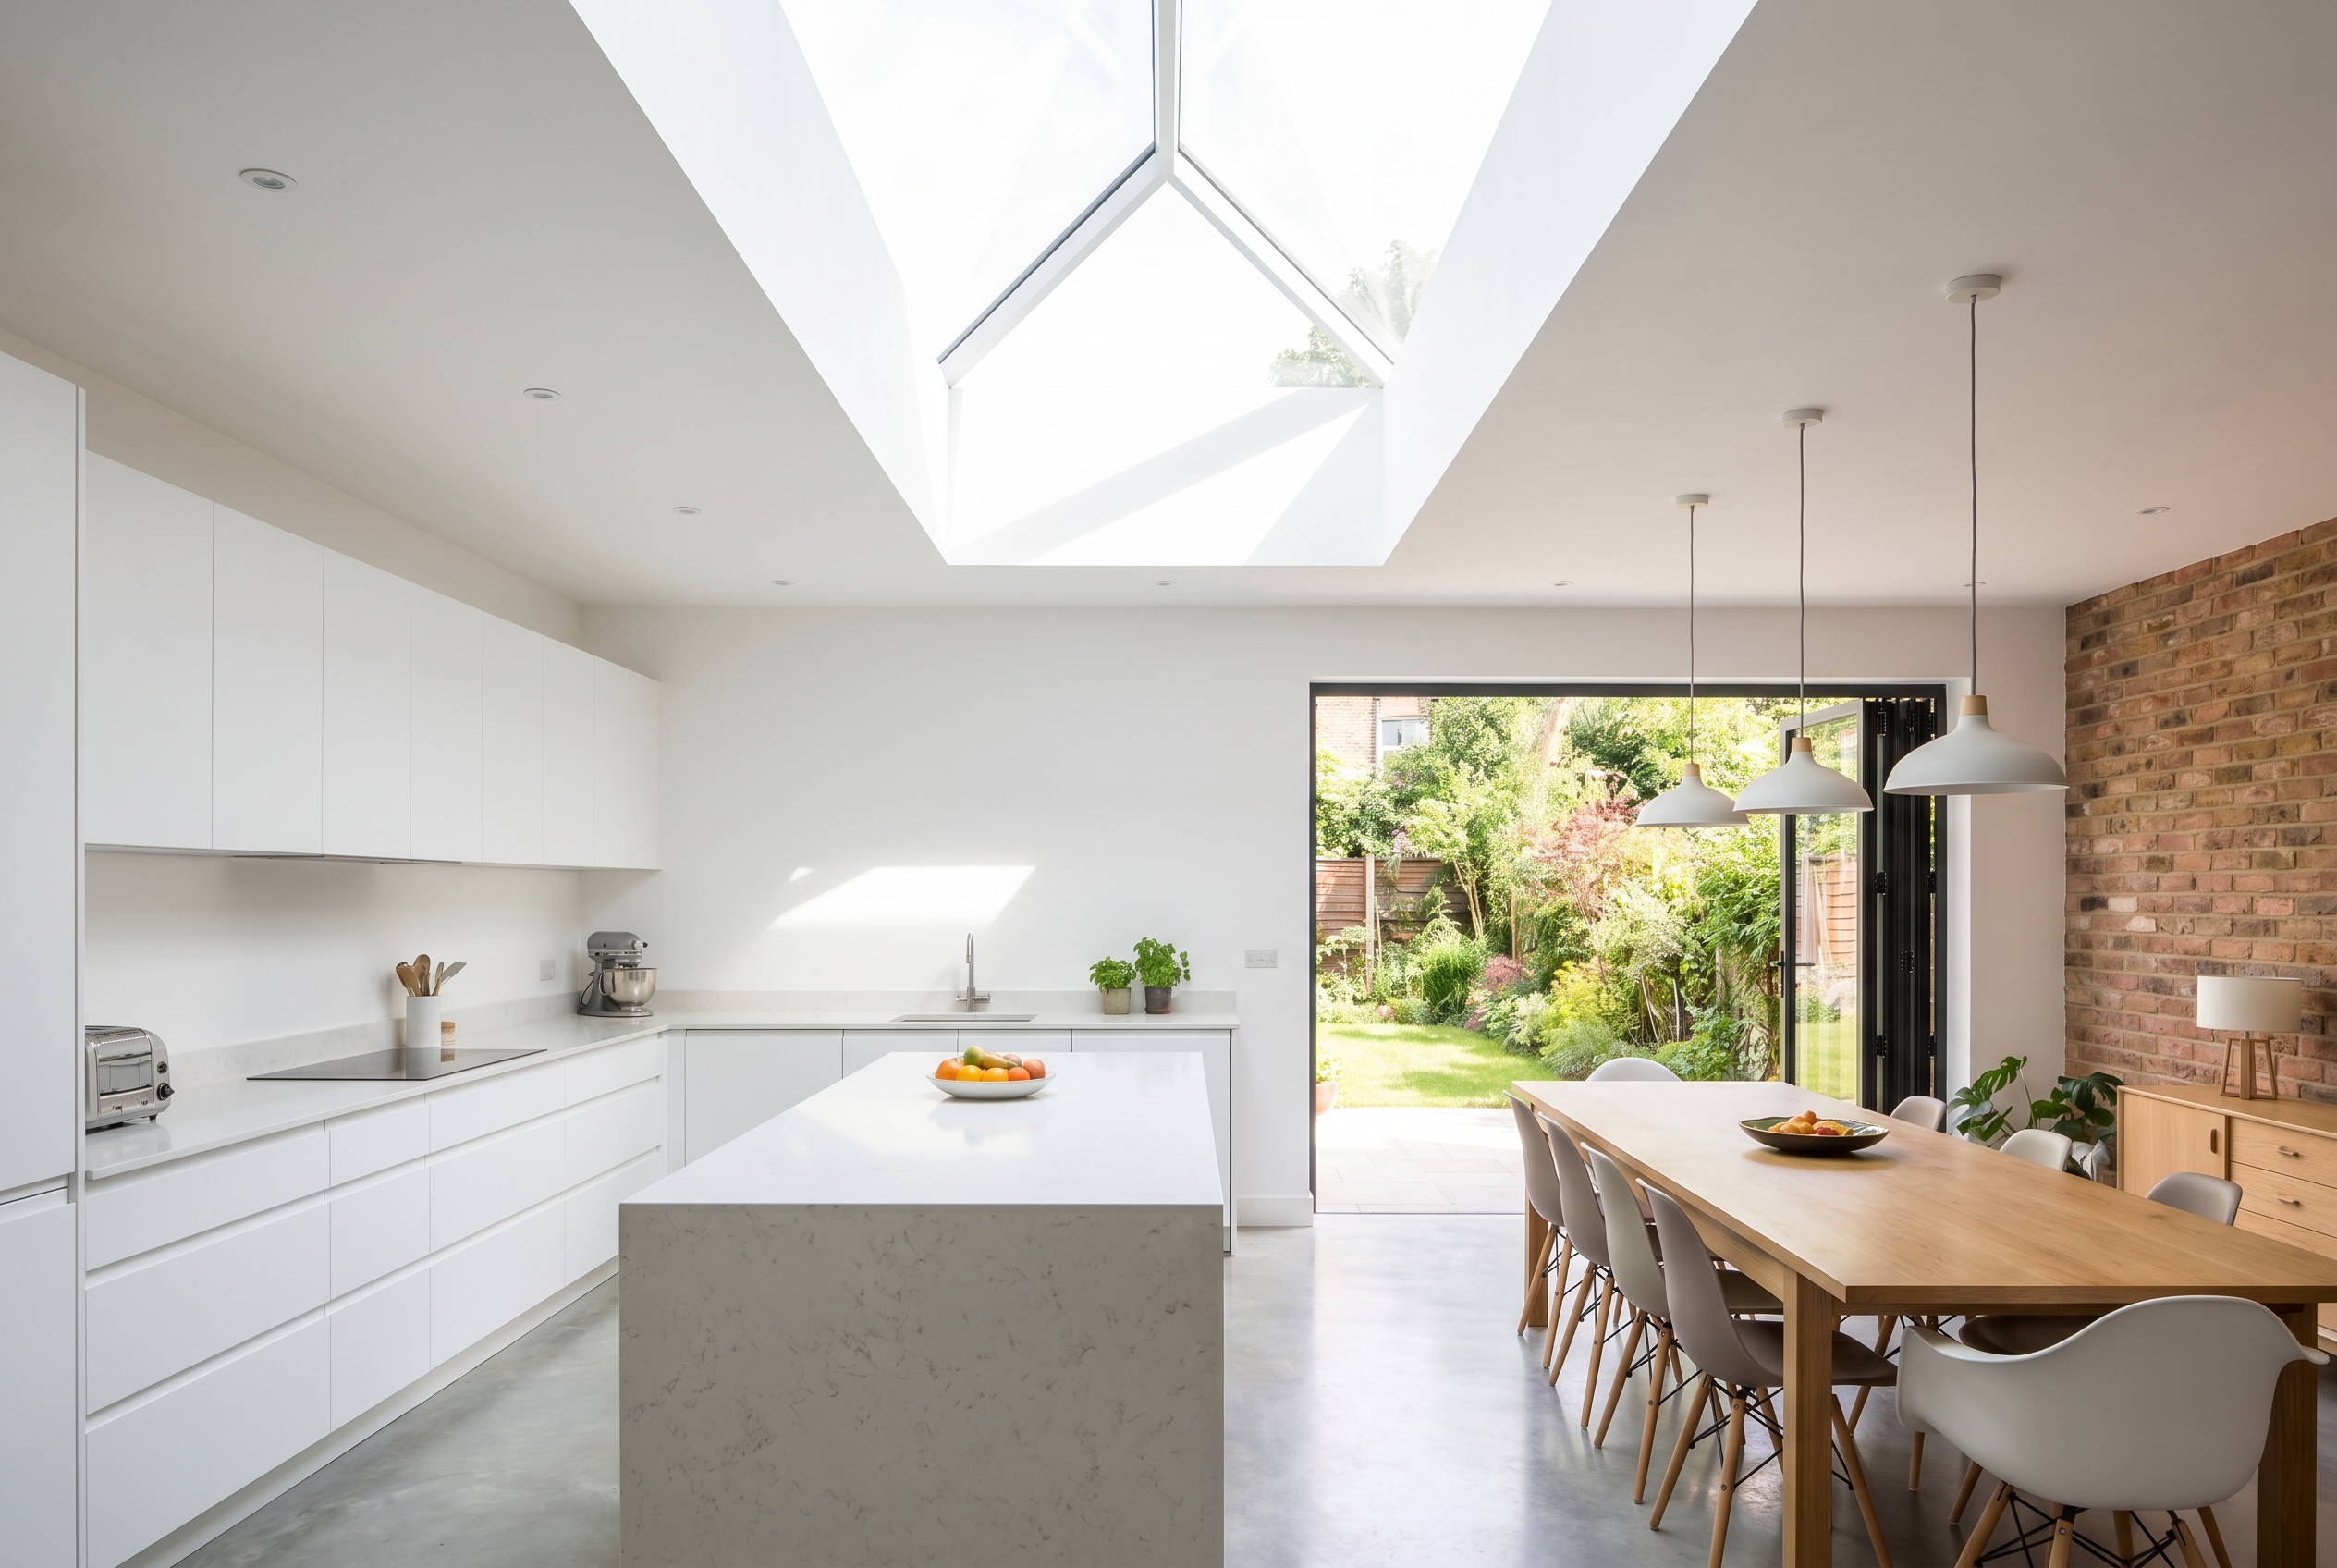
What Is a Side Return Extension?
A side return extension fills in the narrow gap — usually between 1.5m and 3m wide — that runs alongside the rear of a terraced or semi-detached home. It sits next to your existing ground floor, often the kitchen or utility room, and effectively widens and extends the rear of the property.
The result is a much larger ground floor footprint. Most homeowners combine a side return extension with a rear extension to create one big L-shaped open-plan space. Think large kitchen islands, a proper dining area, and bifold doors out to the garden — all in a home that previously had a poky galley kitchen and a separate, cut-off dining room.
Because the side return is typically single storey and fills an otherwise wasted strip, it’s one of the most efficient uses of space on a typical terraced or semi-detached plot.
Side Return Extension Cost: What to Budget in 2026
Costs vary quite a bit depending on how wide the side return is, how far back you extend, and the quality of the finish. As a rough guide for 2026:
- Side return only (approx 10–15m²): £30,000–£50,000
- Combined side return + rear extension (20–35m²): £50,000–£90,000
- High-spec finish with roof lantern, bifolds, premium kitchen: £90,000–£130,000+
These figures include build costs but not furniture or kitchen fitting unless specified. The most significant cost variables are:
- Structural steels — needed to open up the ground floor and support the existing house
- Roof type — a glass lantern or glazed roof adds significant cost but transforms the space
- Bifold or sliding glass doors — a quality set runs £3,000–£8,000 fitted
- Location — London and the South East can add 20–30% to the same spec
Always get a build cost analysis done before committing to a design — it’s one of the things we do as standard for every Arkiplan client so you’re not designing something you can’t afford to build.
Do You Need Planning Permission for a Side Return Extension?
In many cases, no — but it depends on your specific property and how far you want to extend.
Under Permitted Development (PD) rights, a single-storey rear extension can extend up to 4m on a detached house or 3m on any other type, provided it doesn’t extend beyond the principal elevation (the front of the house) and sits within certain height limits. A side return extension generally wraps around the rear, so it can often fall within PD.
However, PD rules include some important restrictions for side extensions specifically:
- A side extension cannot exceed half the width of the original house
- It must be single storey with a maximum eaves height of 4m
- It cannot be closer than 2m to a boundary if over 4m in height
Many terraced homes in Article 4 areas — usually conservation areas or certain urban zones — have had their PD rights removed by the local council. In these cases, you’ll need full planning permission regardless of the size.
The safest approach is always to check with your local planning authority or work with a design team who’ll advise you properly at the outset. At Arkiplan, we handle this as part of the process — there are no nasty surprises later on.
Design Options: Making the Most of a Side Return
The side return is narrow — that’s the nature of it. But good design turns that constraint into a feature. Here are the approaches that work best:
Roof Lantern or Glazed Roof
Because the side return sits between your house and the boundary, it can feel dark. A rooflight or glass lantern overhead floods the space with natural light and is the single design move that transforms a side return from an okay extension to a genuinely special one. Budget £3,000–£8,000 for a decent lantern, installed.
Open it Up to the Rear
Most side return extensions work best when combined with a rear extension or when the rear wall is opened up significantly. This creates the L-shaped footprint that maximises the space and gives you a proper open-plan kitchen-diner-living setup. Structural steels will be needed to carry the load of the original rear wall.
Bifold or Sliding Glass Doors
Full-width bifold or sliding doors at the rear connect the kitchen-diner to the garden and are almost standard on this type of extension. They make the space feel much larger year-round, not just when they’re open.
Keep the Side Boundary in Mind
If you’re extending right up to or near the boundary wall, your designer needs to think carefully about window placement, building regulation compliance, and whether a party wall agreement is needed. Extensions built within 3m of a neighbour’s foundations typically trigger the Party Wall Act.
Building Regulations for a Side Return Extension
Planning permission and building regulations are separate things — and you’ll need building regs approval even if your extension falls within Permitted Development.
Building regs cover the technical side: structural integrity, energy efficiency, fire safety, drainage, and ventilation. For a side return extension, the main areas are:
- Structural calculations — required for any steelwork opening up the original ground floor
- Thermal performance — new walls, roof, and any glazing must meet current U-value requirements
- Drainage — if you’re moving or adding soil pipes, this needs sign-off
- Electrical installation — must comply with Part P, typically certified by a registered electrician
You can go through a full plans application (drawings submitted and approved before work starts) or a building notice (work starts with inspections as it progresses). For a side return extension, full plans is usually the better route because you’re likely dealing with structural work that inspectors want to see on paper before anything is built.
The Side Return Extension Process: Step by Step
Here’s what the typical journey looks like from idea to completed extension:
1. Survey and Design
Before anything can be drawn up, your home needs to be measured accurately. We use 3D LiDAR scanning to capture every dimension of your property in under an hour — far more accurate than tape measures and means your drawings are right first time. From there, we produce concept designs for you to review and refine, usually via a video design meeting.
2. Planning and Building Regs Drawings
Once the design is agreed, we produce the full planning and building regulations drawing set. This includes site plans, floor plans, elevations, sections, and all the supporting documentation. If planning permission is needed, we submit on your behalf. For Permitted Development, we can issue a Lawful Development Certificate application if you want it on record.
3. Structural Calculations
Structural engineer calculations are prepared and included as part of the building regs submission — this is a standard part of our package for extension projects. See our house extension drawings service for full details on what’s included.
4. Find a Builder
With approved drawings and structural calcs in hand, you can approach builders for quotes. Prices can vary enormously — always get at least three quotes. If you’re not sure where to start, Arkiplan clients have access to our Trusted Builder Network, which connects homeowners with vetted local builders.
5. Build
For a straightforward side return extension, build time is typically 10–16 weeks. Your building control inspector will visit at key stages — foundations, steelwork, before the roof goes on, first fix, and final completion. Don’t skip these — they protect you.
6. Completion Certificate
Once signed off, you’ll receive a completion certificate from your local authority. Keep it — you’ll need it if you ever sell the property.
Is a Side Return Extension Worth It?
For terraced and semi-detached homeowners who’ve outgrown their ground floor layout, a side return extension is almost always one of the best investments you can make. It uses space that’s currently wasted, usually doesn’t need planning permission, and delivers a transformation that’s dramatically bigger than the square footage suggests — because you’re opening up the whole rear of the house, not just adding a box.
The return on investment is strong too. A well-designed open-plan kitchen-diner in a terraced home typically adds more value than it costs to build — particularly in urban areas where buyers specifically look for this layout.
If you’re weighing it up, the first step is getting proper drawings done so you know exactly what’s achievable and what it’ll cost to build. That clarity changes everything.